By ruin your printer, I mean that the fibers will begin clogging the ink head and start spurting out black ink dots on your prints halfway through the run. Lettra is too cottony and it is uncoated meaning the digital prints will be dull and soft.
Danielle Feliciano
,@pantherapress
Forum Replies Created
Viewing 11 posts - 1 through 11 (of 11 total)
-
AuthorPosts
-
11 years, 11 months ago11 years, 11 months ago
Go the simplest route you can.
Also I should note, Lettra is HORRIBLE for watercoloring in, it will bleed, warp, stretch, and then dry super dull and ugly. If you insist on hand applying the watercolor you need to buy a watercolor paper (they all lettrepress well) which will cost you double per card what Lettra does at least. I was an illustrator before I was a printer, dont even think about hand watercoloring on Lettra if you want that beautiful bright, watery look. It is not a paper that soaks well, let alone paints well.
11 years, 11 months agoI did this exact thing once. Here is the thing – you will ruin your printer if you put regular lettra in in for a long run and digital printers do NOT print evenly as the grippers which pull in the paper to the printer shift, on the same part of the page, so you wouldn’t have hairline line up if you needed it. I really liked Hahnmule paper for this, it digitally prints and letterpress prints beautifully but it isn’t super thick so be aware, plus it is expensive and cost me a fortune in ink and time. Offest is going to cost you a ton if you do a fully color print, don’t bother with that either.
Why not just do a halftone watercolor splash like I did in the halftone discussion? You could even do a split fountain (gradient) and get a two tone watercolor splash that would look stellar. Printing inkjet is SO slow, it took me about 14 hours of printing to get all the inkjet prints done, it was awful, but for the book I was doing it was needed. I suggest going the halftone route, I really really do.
11 years, 11 months agoFor a job like this I charge 40 an hour. A one color job of 100-200 would take maybe 2 – 3 including cleanup, so I would round up to 100 probably. I charge per print if I have to do all the incidentals like ordering paper, cutting paper, prepping files, getting plates made, setting up, ink mixing, printing, re-trimming to crop marks, and shipping. That way I can be sure to charge for all that extra labor. If you are just printing and handing off, Id say do it by the hour.
11 years, 11 months agoYeah their website is down, they are in the process of re-doing it, you can call though or email. They do any type of photopolymer plate for 50 cents a square inch. Its a nice deal.
11 years, 11 months ago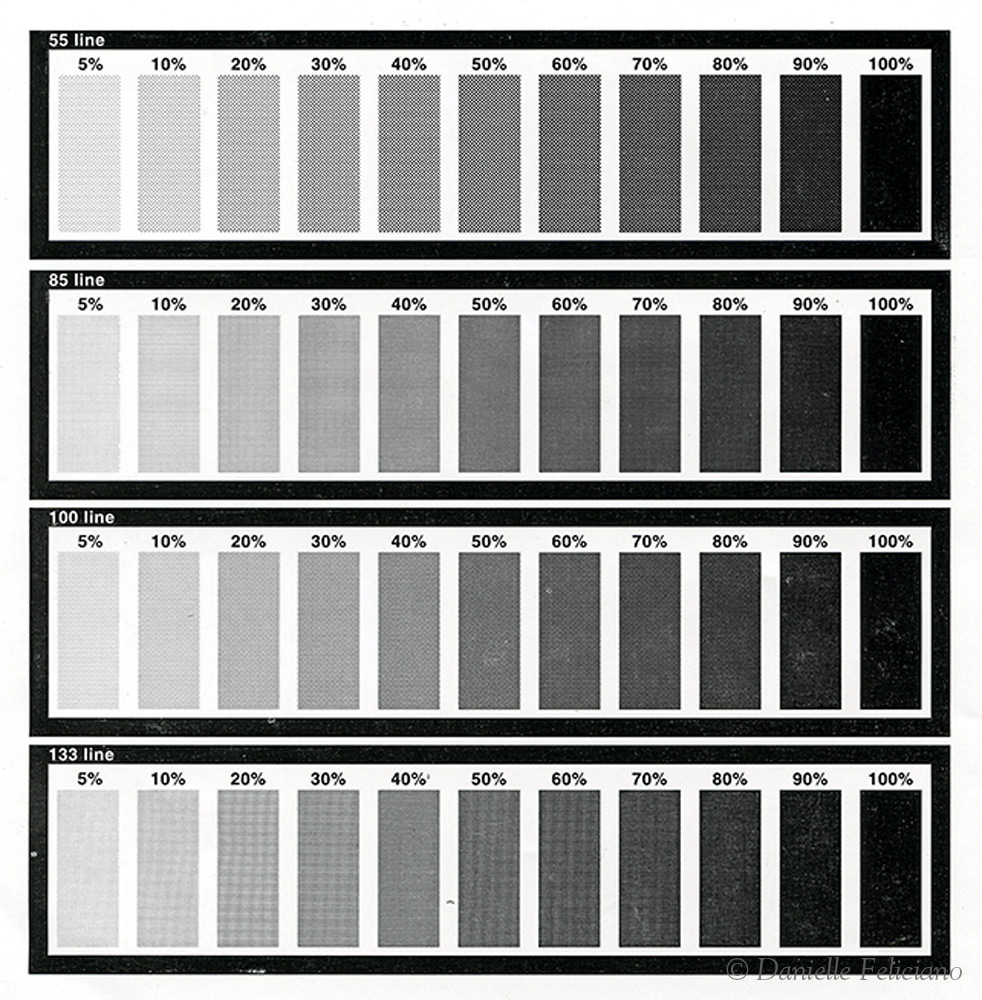 Hey all,
I updated the blog and did some new experiments with more success, you can read my findings there.
Casey – Thank you, however I don’t have an issue making the screens, the plate makers do that for me and even if I wanted to I could use Vectoraster or just photoshop it into a bitmap. It is more in choosing the proper settings to get a nice range of tones or better yet a solid looking two tone effect.
12 years agoNo news yet, I still need to order plates to test, I want to try some different linescreen levels. I will update with a new photo filled blogpost and mention it here when I get the chance though!
12 years agoThanks for the input! I’m more curious than anything. I’m going to try some more experiments and I’ll get back with any questions should I discover anything new.
12 years, 2 months agoAbsolutely, Barbara is right. We do consider the proof presses to be the be all and end of cylinders now a days because they are the more commonly acquired for small shops. I worked for two years in the Minneapolis College of Art and Design print shop we had a Vandercook 219 and I studied the year before on a SP15. I’ve never run any of the larger automated presses platen or cylinder – none of the Heidlebergs or even the Vandercooks with the automatic paper feed (those big strap contraptions). Both of those are entirely different animals in terms of printer involvement and technical knowledge. I’d love to get instruction on them one day, but I’m probably the only letterpress printer where I live other than maybe some small hobby printers I haven’t met. I’m the only one who does it ‘commercially’ as well as ‘artistically’ anyway.
Never heard the rubber band/sandpaper trick! I rarely have trouble pulling out prints because I use mylar / acetate for my top sheet so it’s pretty thick. I always print on a larger sheet and trim so there is usually a non inky area to grab. I may try it one day though.
12 years, 2 months agoI’ve printed on both for years. They have advantages and disadvantages. Here is what I think:
C&P:
– Far more dangerous, you can lose a finger or badly damage your hand if you ‘chase’ a fallen print
– Smaller print area, you can’t print all the way to the edges of the platen
– Probably best to use deep relief plates which cost more and curl a lot over time
– Uneven inking – because the force of the print must be applied all at once, you’re more likely to get light and dark spots or uneven prints
– Pins -I used compressible pins that can be lifted and repositioned without damaging my tympani so that’s not a disadvantage for me but be careful if you use metal pins!
-/+ Alignment – I find it slightly harder to align prints on a Platen, though for both presses I use a technique where I apply the print side to the paper, tape it down in place, and then slip the paper in the pins/grippers, remove the adhesive and run a print to deposit the plate to the base. Works well with both presses, though I though it was easier with the thinner plates I used on the Vandercook.
+ Uses much less ink and is SO much easier to clean and oil
+ Speed – you will print faster and you don’t have to walk and turn the handle (as with the unmotorized cylinders I always used), it’s less hard on the body, this is the primary advantage for me on these presses, I can probably print 3x as fast, and I was like LIGHTNING on the Vandercook, faster than anyone else in the shop
+ More Mobile and easier to maintain – they simply have less complex internal parts, so I think they are easier to tune up and move with a palette jack (especially if you mount yours on runners)
+ Easier makeready – Adding padding, removing ink, switching colors, and all that is infinitely easier on a platen once you’re used to it. Many vandercooks have adjustable beds which is nice and you can make some adjustments to alignment near the grippers – eh both presses have certain parts which are easier, but I HATED having to undo the packing on the Vandercook or stuff a bunch of sheets under my printing sheet each time I went to pull a print. I often taped my makeready right onto the cylinder but it shifted and frayed and was generally frustrating.
+ Trip/Throw off Lever is much easier and more useful during the printing process
Cylinder:
+ Consistent inking, and it’s easy to add ink without removing the forme (whereas on the platen I usually remove the chase or the rollers fill in my plates/type)
+ Gradients/Split Fountain printing is easier, just remove the worm gear screw (oscillating gear) once you like your gradient and you’re good to go. On my platen I have to hand roll the gradients and hand add more ink
+ Larger prints with more even inking on large solids – this to me is the major advantage and the reason I really want to get one in my shop, I do book works, and large books have large spreads which print better on cylinders
+ Less misfeeds, It’s just easier and less urgent to line up the paper int he grippers than it is to feed into pins so I’d say I prefer that
– I covered all the disadvantages in the advantages of the C&P though they could be summarizes as huge and heavy, more complex and difficult to maintain, take FOREVER to clean so ink is often muddy from previous colors (never have this problem with c&p, always had to use easy street on the Vandercook or run white ink to pull it out of the rollers), harder to adjust makeready, harder to lock up with hand set type (have to move the type and get it all on the bed in the right spot with lots of furniture), uses more ink, electricity, and material in general.
I like both – platen for longer stationary runs (wedding invites etc) and the cylinder for more fine artwork and book making.
Also regarding safety, pretend to feed for a while, just getting the rhythm of printing, always be really focused, and stand up straight so you aren’t leaning into the jaws. Check the speed, if you can’t slow it down and it runs fast, you may be in a for a dangerous printing session. NEVER CHASE A FALLING PRINT – one that misses the grippers. Go slow, it’s better to set your ink level so it requires a double pass with the rollers than to have to rush to remove and replace the paper. Let it go two cycles if you need so you can use one cycle to remove the paper and the second to get the new sheet in an aligned.
12 years, 2 months agoA lot it feels like. Though to be honest, I lose more mid run than at the beginning. It may take me about 10 prints per color to get it all ready (sometimes less, as few as 2-3), but inevitably midway through the inking gets off (a light or dark spot forms and packing needs adjusting or more ink is needed) or I misfeed every once and while (not too often, but hairline lineups can be a pain). I keep my inking really light so I really do tend to lose the 10 percent in the end simply because I lose one or two right before and right after I add ink (the former because it’s too light thus prompting me to add ink, and the latter because it’s too dark) I always remove the chase before adding inking because I hate getting fill in on my plates or heavy spots. Always print more than you think you need for a commercial job, you’ll sort through them and find plenty less than perfect ones to toss out. I’m also very picky about what constitutes an acceptable print.
-
AuthorPosts

Viewing 11 posts - 1 through 11 (of 11 total)